User Guide
Casual Fitness v3.1 — Gym Management System
This user guide will walk you through the steps and processes needed to explore each feature of the application. It is recommended to read this guide to familiarize yourself with the instructions provided, so you can fully utilize the application's features.
- Version: 3.1
- Author: SpantikLab
- Created: 21 Feb, 2019
- Update: 01 Sep, 2024
If you have any questions that are beyond the scope of this help file, Please feel free to email via Item Support Page.
Scope
The user guide is designed to familiarize users with each function of the application. To achieve this, the guide is divided into distinct sections, with each section focusing on a specific function.
In this section, we will outline the steps and guidelines for registering a new member. We will also discuss the events that occur during the process of creating a new member.
Membership Plan
Before registering a new member, we need to create a membership plan. Please follow the steps outlined below.
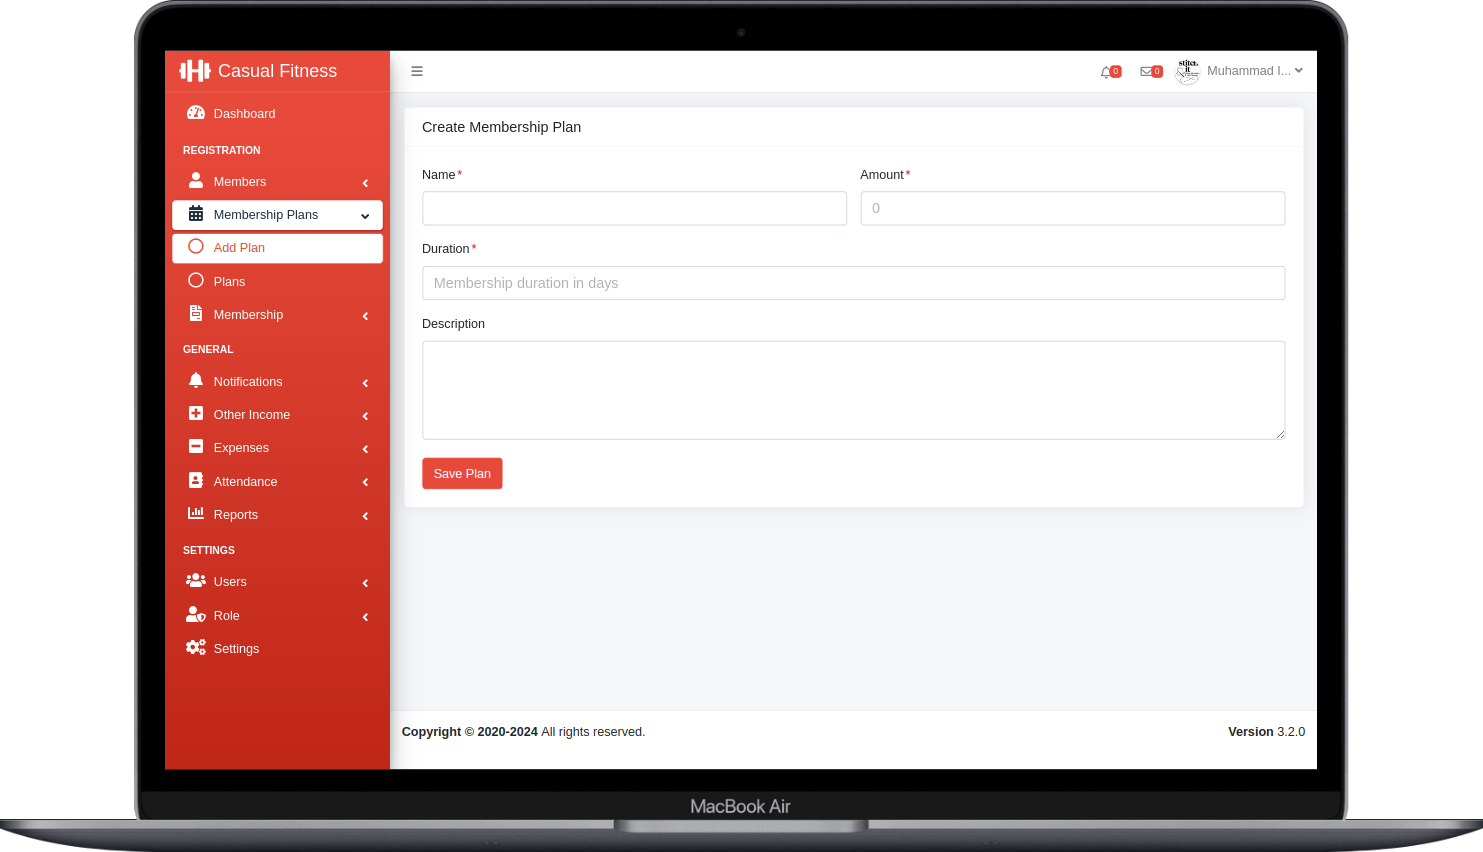
Steps to Create Membership Plan
- Step#1 Navigate to
Membership Plans/Add Planfrom the side menu. - Step#2 Complete all required fields. Below is a guide for each input field:
- Name: This required field specifies the membership plan's name, such as "Monthly Plan," "Weekly Plan," or "3 Months Plan."
- Amount: This required field indicates the cost of the membership plan in numerical form, (e.g, 30, 40, or 50).
- Duration: This required field defines the membership plan's duration in days. The field accepts only numbers (e.g., 7, 30, 90). The value you enter will later be used to calculate the plan's expiry date.
- Description: This optional field allows you to add notes or any additional information about the membership plan.
- Step#3 Once all the necessary information is provided, click the "Save Plan" button at the bottom of the form to create a new Membership Plan.
Member Registration Form
Once the membership plan is successfully created, you can proceed with member registrations.

Steps to Register a New Member
- Step#1 Navigate to
Members/Add Memberfrom the side menu. - Step#2 Complete all required fields. Below is a guide for each input field:
- Registration No: This field automatically generates a unique member registration number. By default, the field is disabled, ensuring the system assigns a unique value that won't conflict with other members registration numbers.
- Name: This required field specifies the name of the member, (e.g, John Doe, Ali, Alex Smith).
- Gender: This optional field indicates the gender of the member.
- Age: This optional field specifies the age of the members in numerical form. (eg, 20, 30, 40)
- Phone: This required field accepts the contact number of the member.
- Address: This optional field specifies the residential address of the member.
- Height: This optional field accepts the height of the member in numerical form.
- Weight: This optional field accepts the weight of the member in numerical form.
- Interested Area: This optional field indicates the interest of the member. (eg: BodyBuilding, Yoga, Cardio, Strength Training)
- Profile Picture: This optional field accepts a member photo, the photo size must be under 2MB.
- Status: This optional field indicates the active status of the member, later in case member does not continue his membership you can change the member status using this field.
- Membership: This required field consist of the membership plans, you can select any membership plan, only a single plan can be assigned at a time.
- Membership Valid From: This required field indicates the starting date of the membership.
-
To: This required field indicates the ending date of the membership, by default the field is disabled and the value is calculated dynamically using the
Duration Fieldfrom the selected membership plan. - Step#3 Once all the necessary information is provided, click the "Save Member" button at the bottom of the form to create a new Member.
Adding Payments
Upon successful member creation, a Debit Transaction is automatically generated with the membership fee amount specified during the plan creation. To add a payment, please follow the steps outlined below

Navigate to Membership > Membership Payments to view the list of memberships. Each membership has three buttons: Add Payment , Print, and Delete. To add a payment, click on the Add Payment icon, which will redirect you to the payment screen.
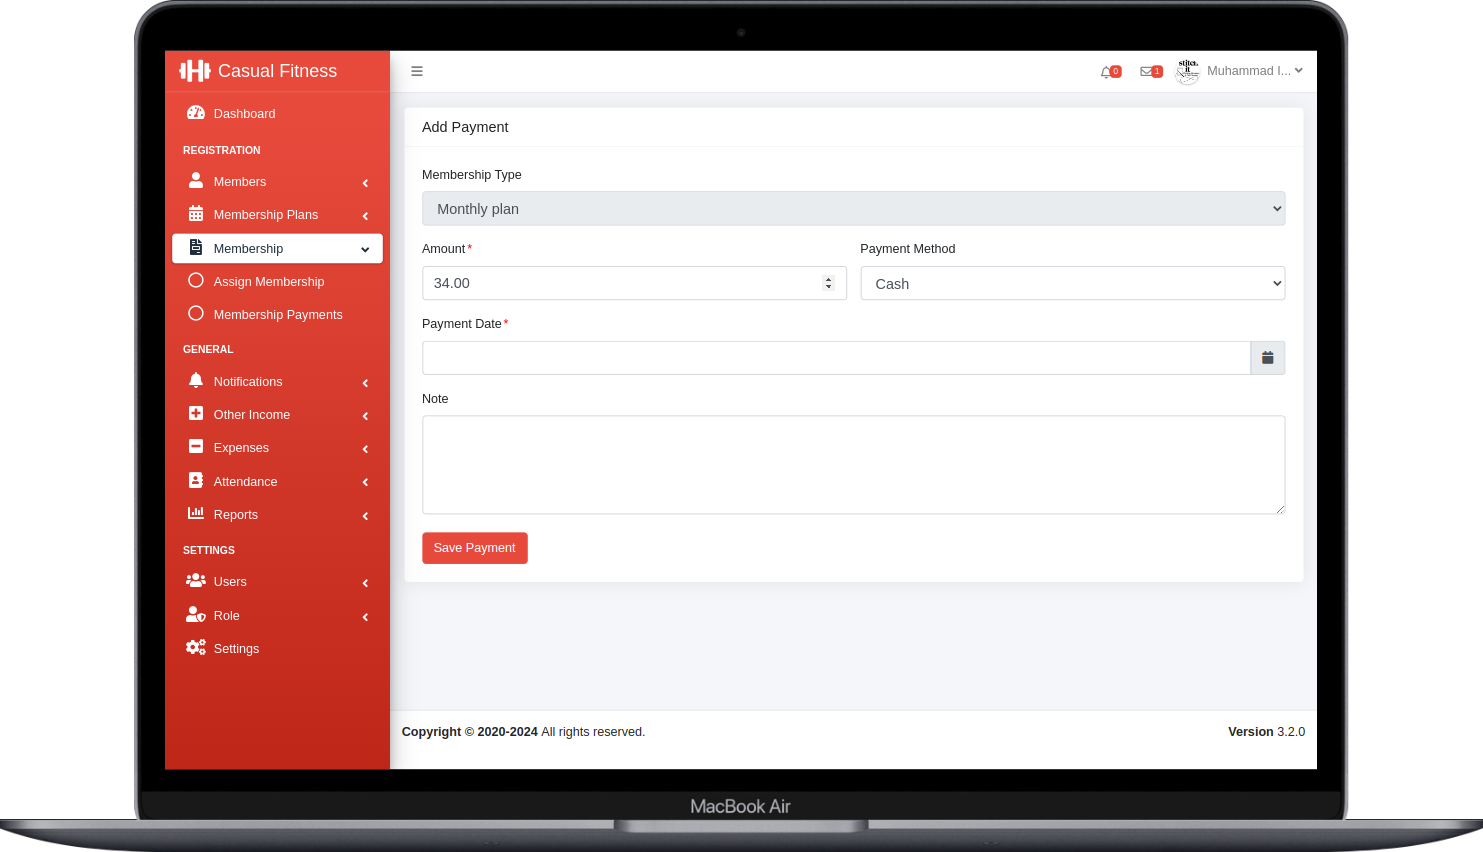
Steps to Add Payments
- Step#1 Navigate to
Membership > Membership Paymentsfrom the side menu and click on the Add Payment icon for the membership you wish to add a payment to. - Step#2 Fill in the required fields. Here's a guide for each input field:
- Membership Type: This field is disabled while adding a payment and defaults to the membership type you selected from the membership list.
- Amount: This required field specifies the total amount payable by the member. You can choose to make a partial payment or pay the full amount at once.
- Payment Method: This optional field allows you to select a payment method from the dropdown list.
- Payment Date: This required field indicates the date when the payment was made.
- Note: This optional field lets you add notes or any additional details about the transaction.
-
Step#3 After providing all the necessary information, click the Save Payment button at the bottom of the form to create a new payment. A new
Credit Transactionwill then be generated, specific to that member and membership plan.
Suppose a specific member's membership has expired, and you need to assign a new one. Here are the steps and process to assign a new membership plan to that member.
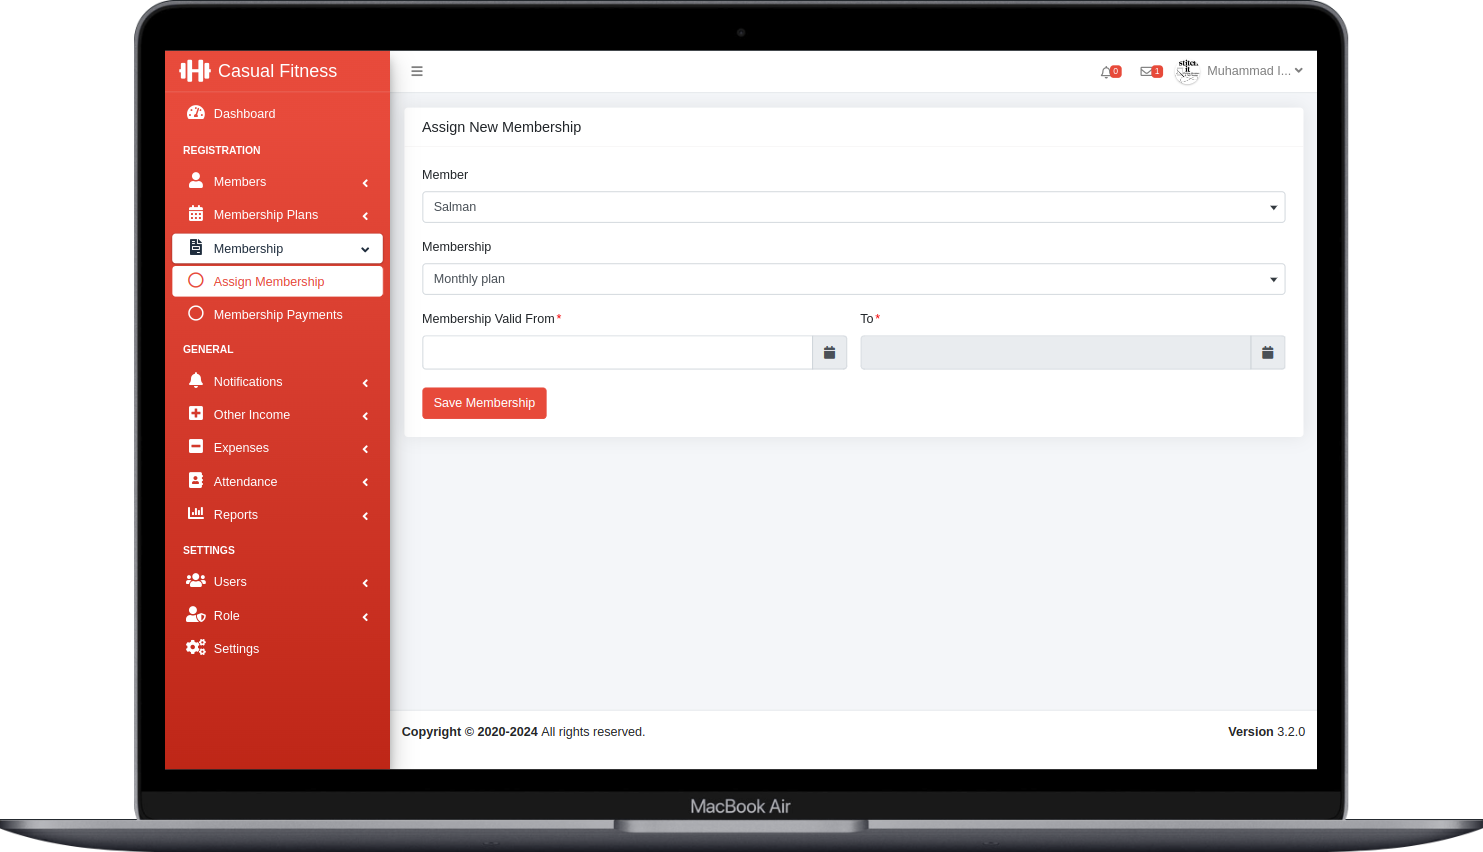
Steps to Assign New Membership Plan
- Step#1 Navigate to
Membership/Assign Membershipfrom the side menu. - Step#2 Complete all required fields. Below is a guide for each input field:
- Member: This required field displays all registered members. You can filter the list to select the member to whom you want to assign a membership.
- Membership: This required field displays all the membership plans. You can filter the list to select the membership plan you want to assign to the member.
- Membership Valid From: This required field indicates the starting date of the membership.
-
To: This required field indicates the ending date of the membership, by default the field is disabled and the value is calculated dynamically using the
Duration Fieldfrom the selected membership plan. - Step#3 Once all the necessary information is provided, click the "Save Membership" button at the bottom of the form to assign a new Membership Plan.
-
Note: Once a new membership is assigned, a
Debit Transactionis created. To add payments for the newly assigned membership, follow the same steps outlined in the previous section on how to register a new member.
You have two options for recording members' attendance: the Manual Attendance option or the Attendance Sheet. Manual Attendance is ideal for marking a single member’s attendance, while the Attendance Sheet is better suited for taking batch attendance. Below are the steps for using both methods.
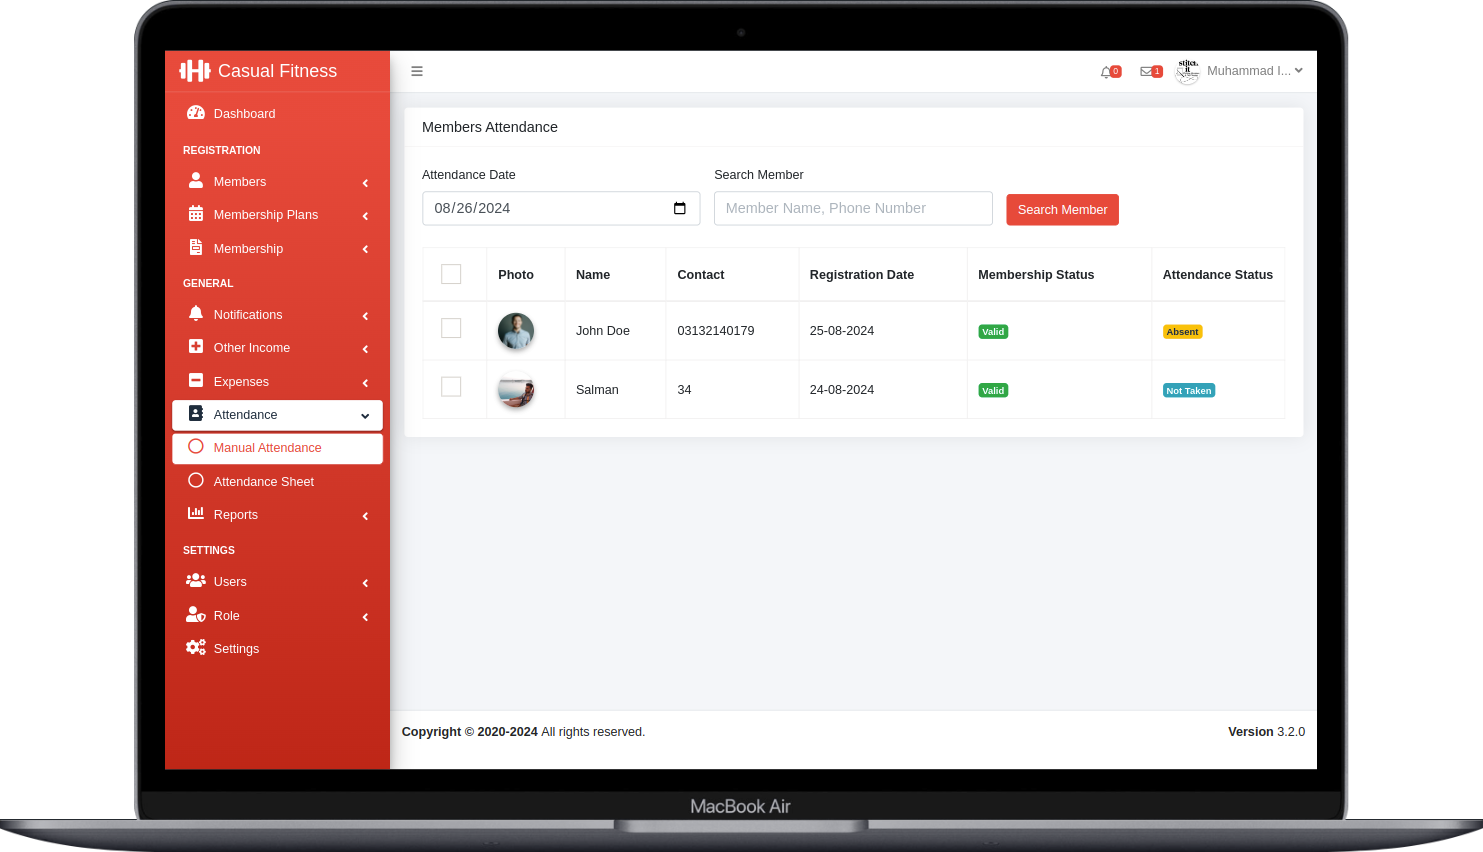
Steps to Take Manual Attendance
- Step#1 Navigate to
Attendance/Manual Attendancefrom the side menu. - Step#2 By default, the member list is displayed with the date set to the current day. Each member has a checkbox, allowing you to select one or multiple members for attendance. There are also optional fields available above; details about these fields can be found below.
- Attendance Date: This required field specifies the date for which day attendance needs to be taken.
- Search Member: This optional field allows you to search for a specific member, you can search by the member name, phone number or member id.
- Attendance Status: This required field indicates the status of the attendance, you can select from the two options listed (Present or Absent).
-
Step#3 After selecting the members you can press the
Save Attendancebutton, after that the attendance will be taken and list will repopulate with the attendance status. -
Note: By default, the status of the attendance is set to
Not Taken, it will update once you mark the attendance for the specific members.
Now, let's discuss how to take attendance using the Attendance Sheet. The process is generally similar to what we covered earlier, with a few modifications. When using the Attendance Sheet, you will see a list of all members and have the option to mark or update attendance for multiple days. Below is a detailed guide on how to take attendance using the Attendance Sheet.
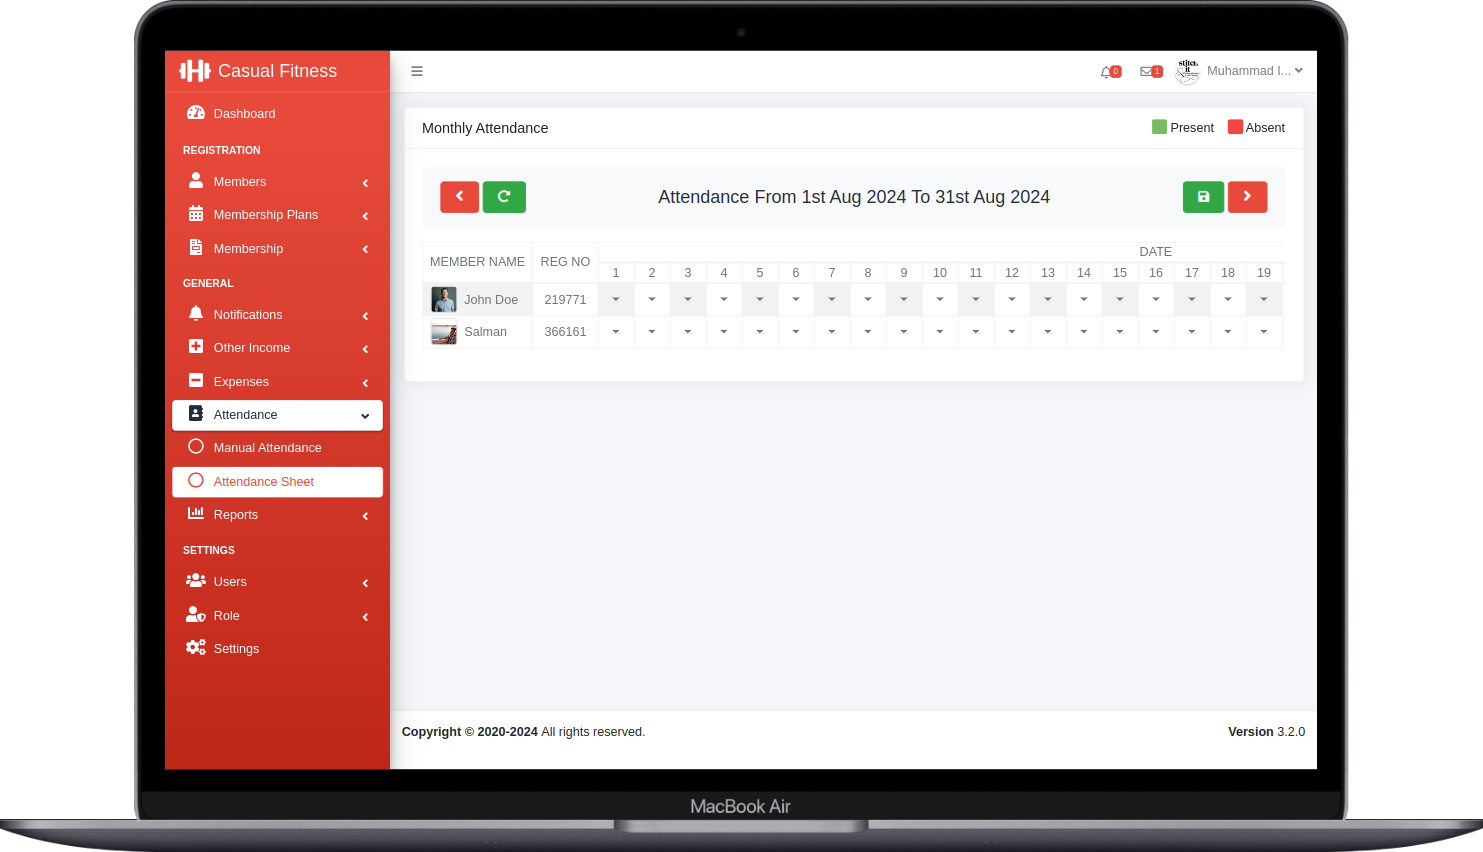
Steps to Take Attendance From the Attendance Sheet
- Step#1 Navigate to
Attendance/Attendance Sheetfrom the side menu. - Step#2 Initially, you'll see two navigation buttons to switch between months, a refresh button, and a save attendance button. In the center, you'll find the title displaying the date range for which the attendance is listed. Below are the steps on how to take attendance.
- Step#3 In the Attendance Sheet, you'll find a dropdown icon below each day of the month. Each dropdown lets you select the attendance status—either Present or Absent. You can choose between these two statuses. The Attendance Sheet allows you to record attendance for multiple days for a single member or for multiple members at the same time.
- Step#4 After selecting the attendance status, click the save button at the top to mark the attendance. Once saved, the Attendance Sheet will refresh and display the updated attendance status.
In this section, we will cover the general features available in the application. First, we'll discuss how to use the Notifications, Other Income, and Expenses features. Following that, we'll take a closer look at the Reports. All these options can be accessed from the sidebar within the application.
Notification
The Notification section provides an overview of members' memberships and payment statuses. Within this section, you'll find two options: Unpaid Members and Ending Memberships. We will discuss both options in detail below.
Unpaid Members
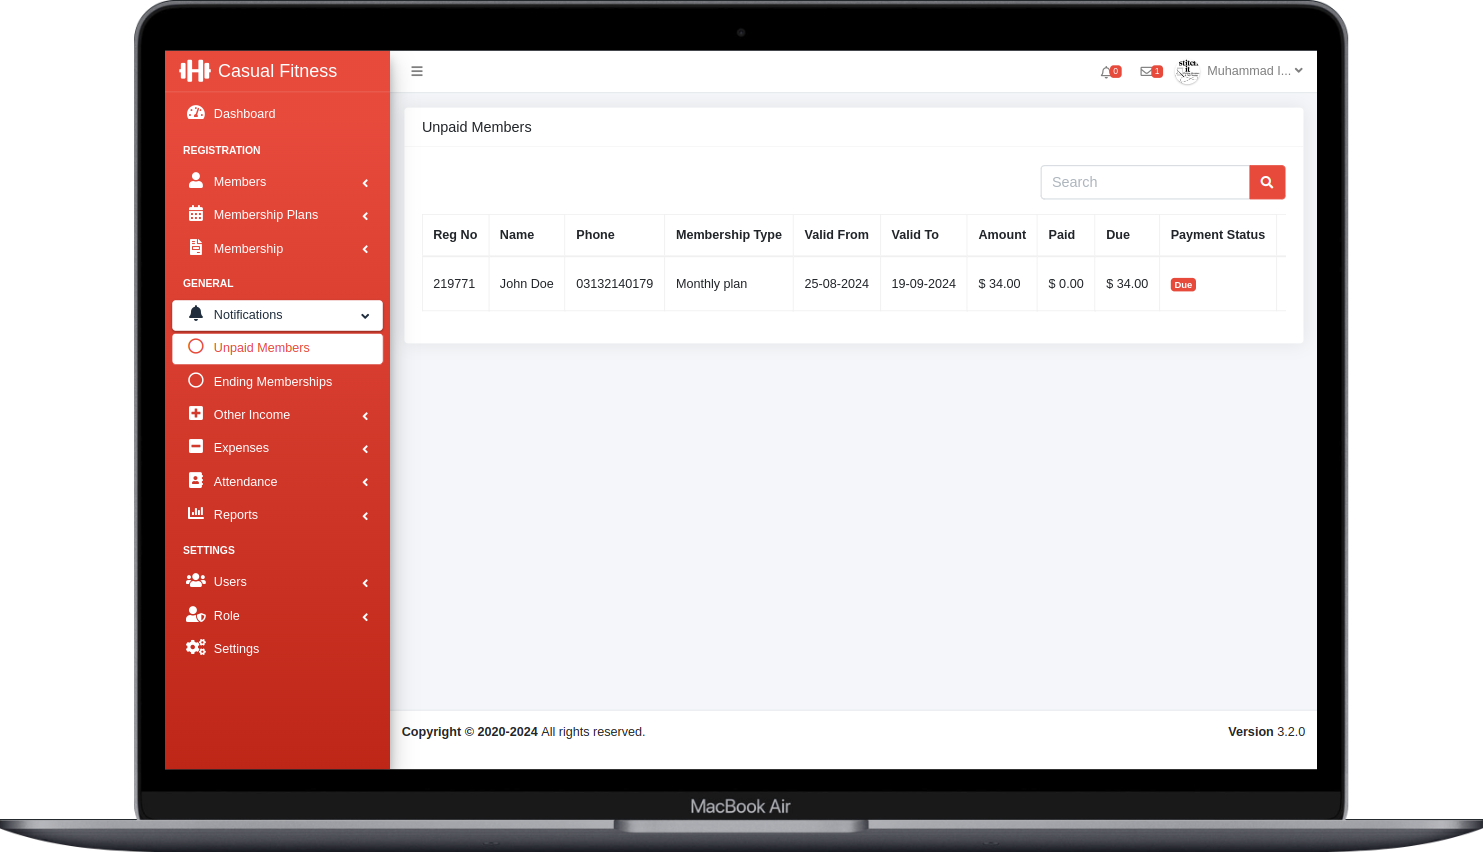
Steps to Utilize the Unpaid Members Section
-
Step#1 Navigate to
Notification > Unpaid Membersfrom the sidebar. Here, you'll find a list of members with due or partially paid payments. - Step#2 Next to each item in the list, there are two buttons: Print and Add Payment
- Print Button: Use this button to print the invoice for that specific membership.
- Add Payment Button: Click this button to add payments. The process is similar to what was discussed earlier for registering a member.
- Note Once the full payment has been made, the selected item will be removed from the list, as it will no longer have any outstanding balance.
Ending Memberships
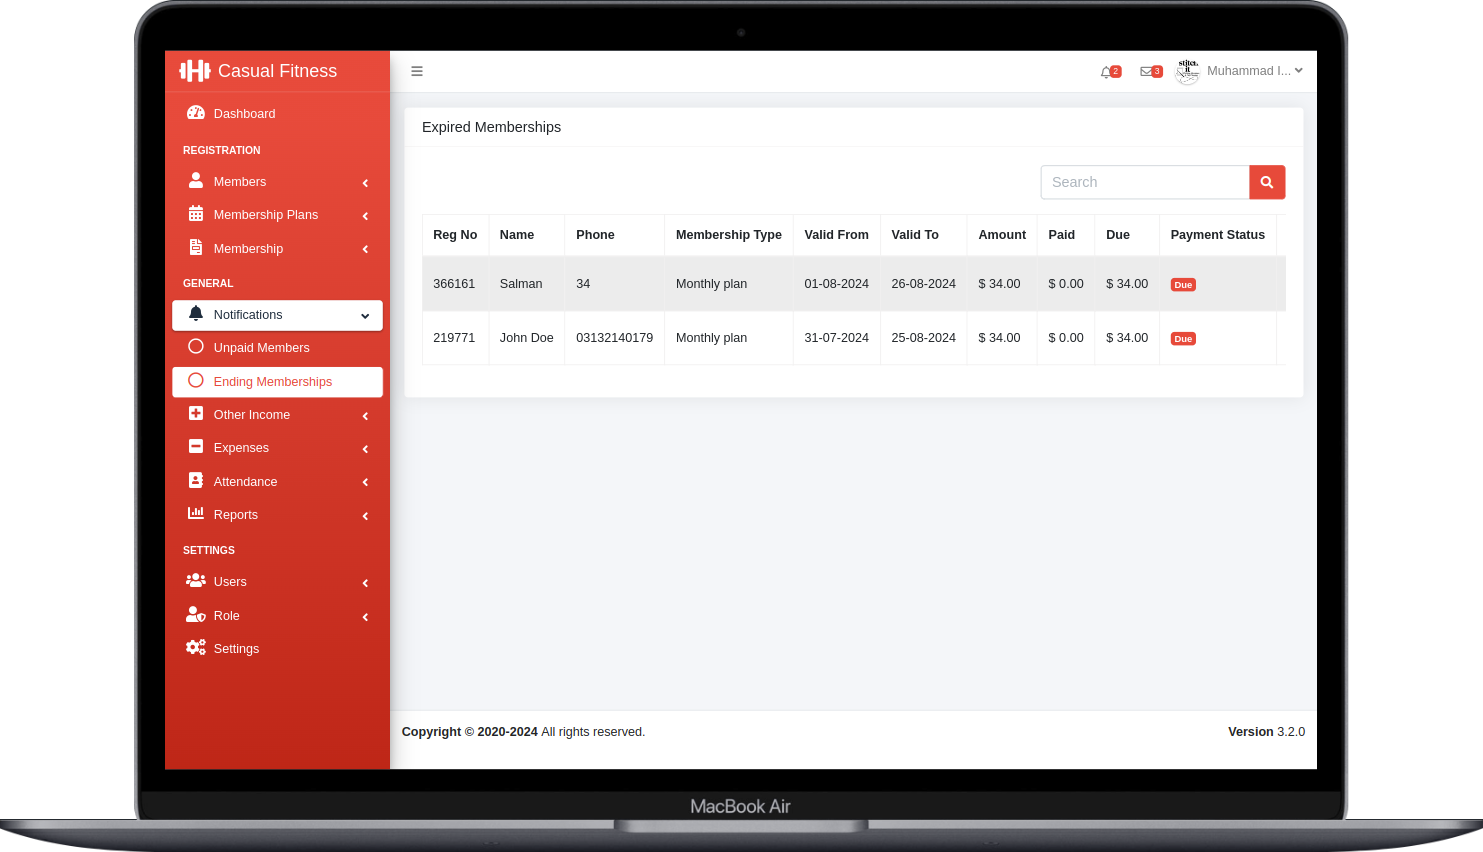
Steps to Utilize the Ending Membership Section
-
Step#1 Navigate to
Notification > Ending Membershipsfrom the sidebar. Here, you'll find a list of members whom memberships are expired or near to expire. - Step#2 Next to each item in the list, there are two buttons: Renew Membership and View Profile
- Renew Membership: Use this button to renew or assign new membership of the member, The process is similar to what was discussed earlier for assigning new membership.
- View Profile Button: This button is used to preview the member's profile, where you can view their membership history.
Other Income and Expenses
In this section, we will discuss the purpose of the Income and Expense feature and learn how to use it to its full potential.
Other Income
This feature records income that is separate from membership payments. For example, it can be used to track registration fees or the sale of other goods, such as supplements, gym starter kits, stretch bands, and more.
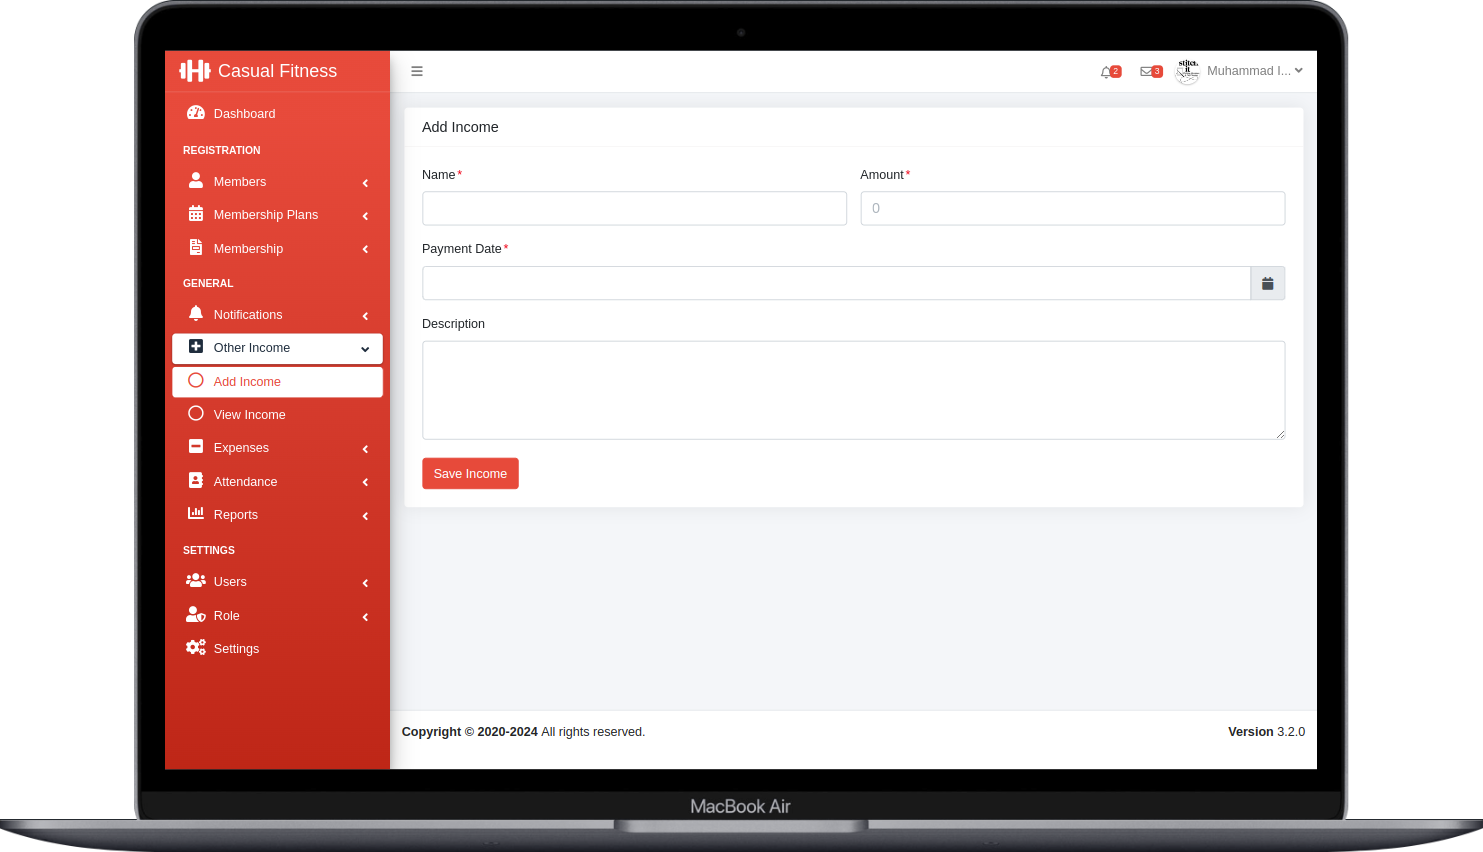
Steps to Add Other Income
- Step#1 Navigate to
Other Income/Add Incomefrom the side menu. - Step#2 After navigating, a form will appear with several input fields. Here’s a breakdown of each field:
- Name: This required field specifies the name of the income source.
- Amount: This required field specifies the amount received from this income.
- Payment Date: This required field specifies the date on which the income was received.
- Description: This optional field allows you to add additional details about the received income.
- Step#3 Once all required fields are completed, press the Save Income button. A new transaction will be recorded as Other Income and you can view this transaction in the transactions list.
Expenses
This feature allows you to keep track of expenditures. Each entry is marked as a Debit Transaction and categorized as Expense
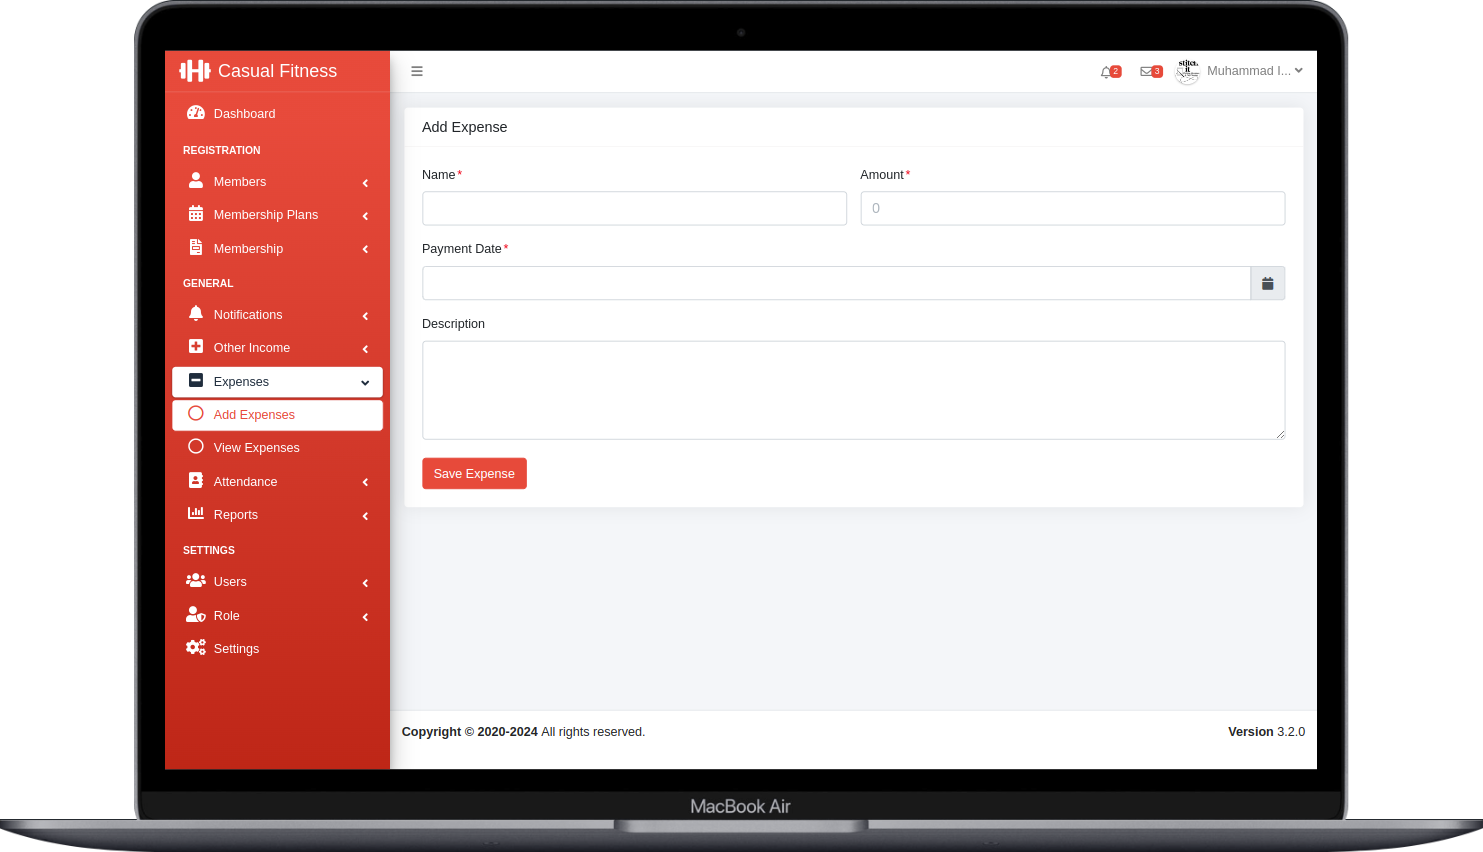
Steps to Expense Entry
- Step#1 Navigate to
Expenses/Add Expensesfrom the side menu. - Step#2 After navigating, a form will appear with several input fields. Here’s a breakdown of each field:
- Name: This required field specifies the name of the expense source.
- Amount: This required field specifies the debit amount.
- Payment Date: This required field specifies the date of the expense entry.
- Description: This optional field allows you to add additional details about the expense entry.
- Step#3 Once all required fields are completed, press the Save Expense button. A new debit transaction will be recorded catagories as Expense and you can view this transaction in the transactions list.
Reports
In this section, we will explore the different types of reports available. We'll go through each report in detail. Below are the available reports.
Member Information Report
Member Information Report displays a list of all active members. You can export this report in your desired format, with options including CSV format, or you can print the report directly.

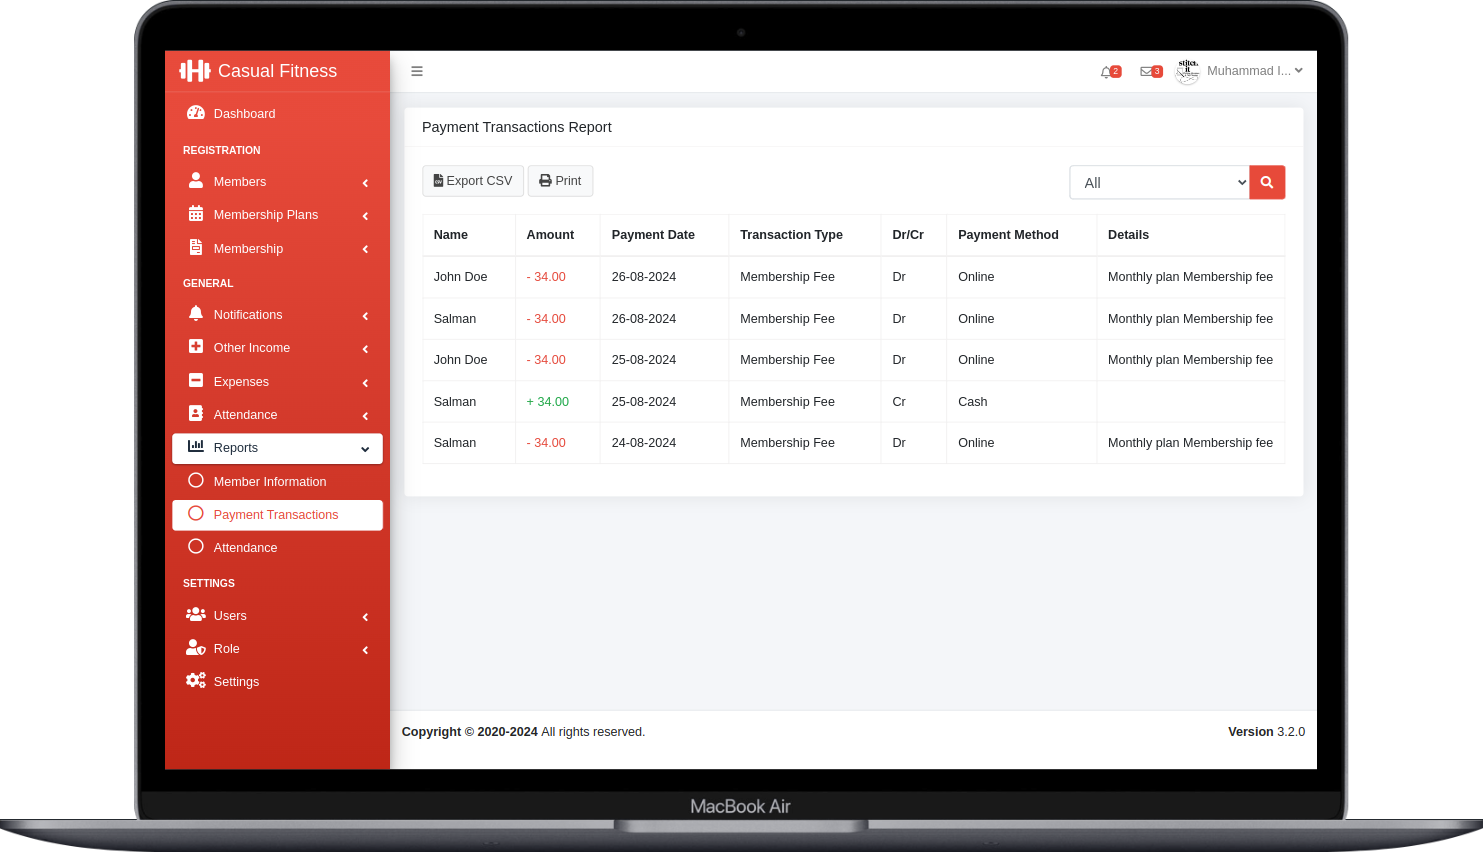
Payment Transactions Report
Payment Transactions Report displays a list of all Debit/Credit Transactions. You can export this report in your desired format, with options including CSV format, or you can print the report directly.
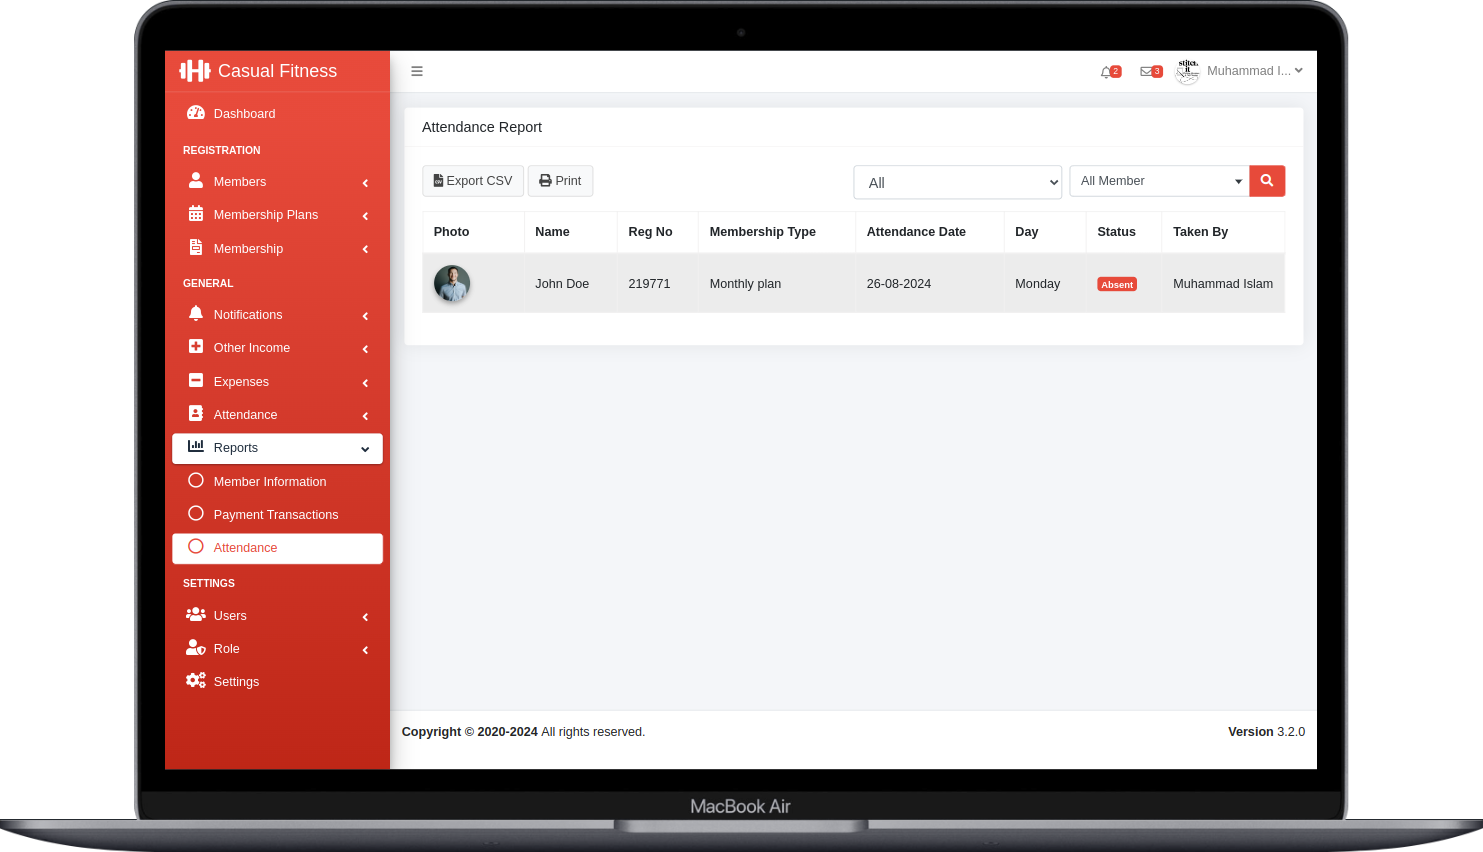
Attendance Report
Attendance Report displays a list of members attendance. You can export this report in your desired format, with options including CSV format, or you can print the report directly.
If you need to grant additional users access to the system but want to limit them to specific sections of the application, follow the steps below to create users and assign different roles.
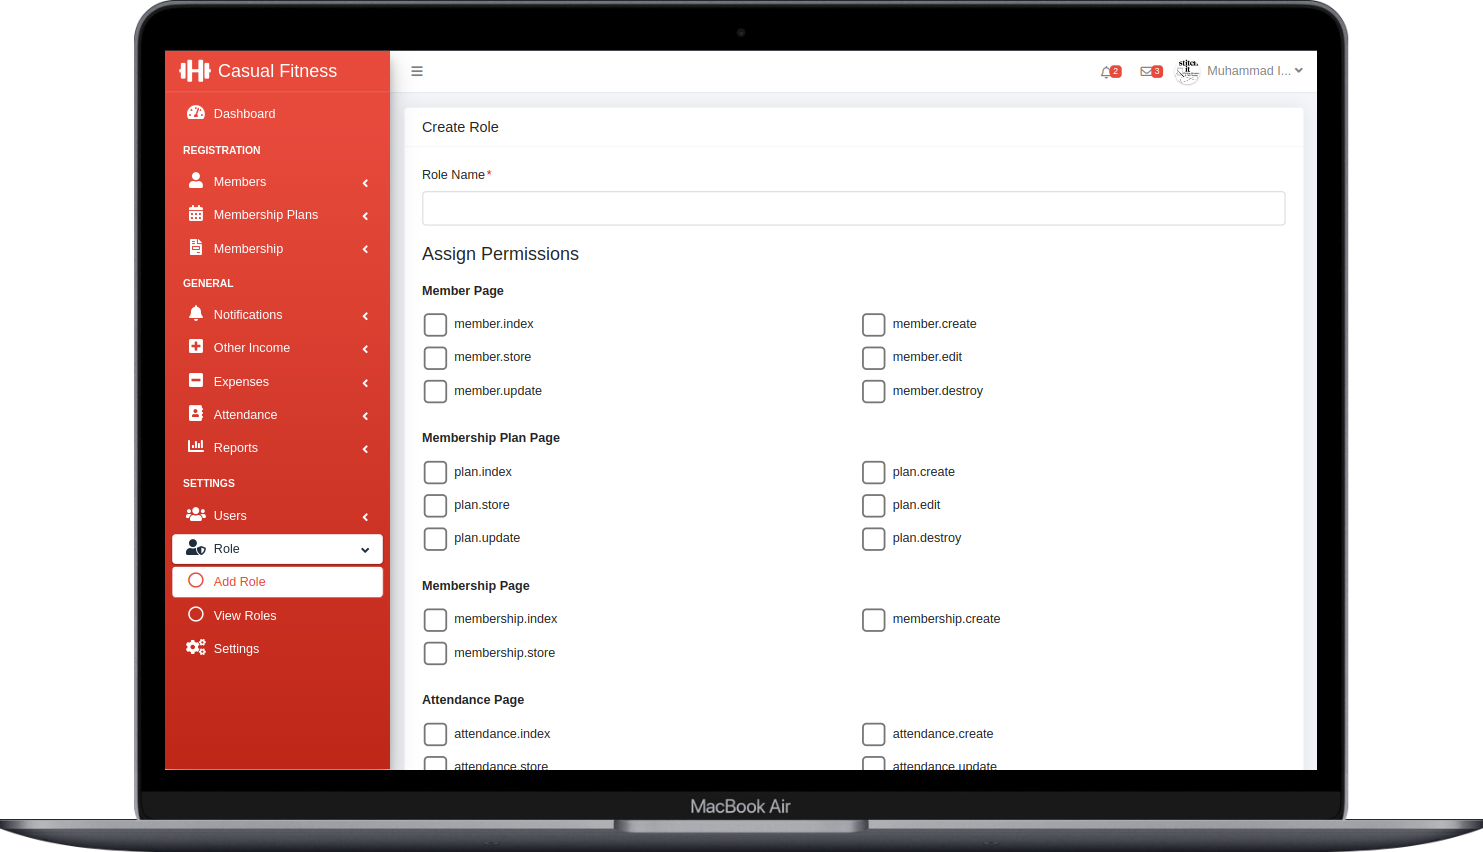
Creating a User Role
We will cover access controls for the Member Registration page, discussing the available permissions for this specific page. The same guidelines will apply to the other pages. Below is a simple overview of the controls available for the Member Registration page.
Steps to Create User Role
- Step#1 Navigate to
Role/Add Rolefrom the side menu. - Step#2 Enter a name for the role in the Role Name field. This is a required field and specifies the name of the user role (e.g., Staff, Manager, Attendance Taker).
-
Step#3 Below the Role Name field, you'll find a list of all available pages with their respective permissions. For this guide, we'll focus on access controls for the Member page. The process for other pages is similar:
- member.index Allows users to access the members listing page. Select this option to grant access.
- member.create Allows users to access the member registration page. Select this option to grant access.
- member.store Grants users permission to create new members. Select this option to enable this feature.
- member.update Allows users to update member information. Select this option to grant access.
- member.edit Provides access to the member edit page. Select this option to enable this feature.
- member.destroy Allows users to delete a member. Select this option to grant this permission.
- Note: Once the role is created, you can assign this role to multiple users from the creating users page.
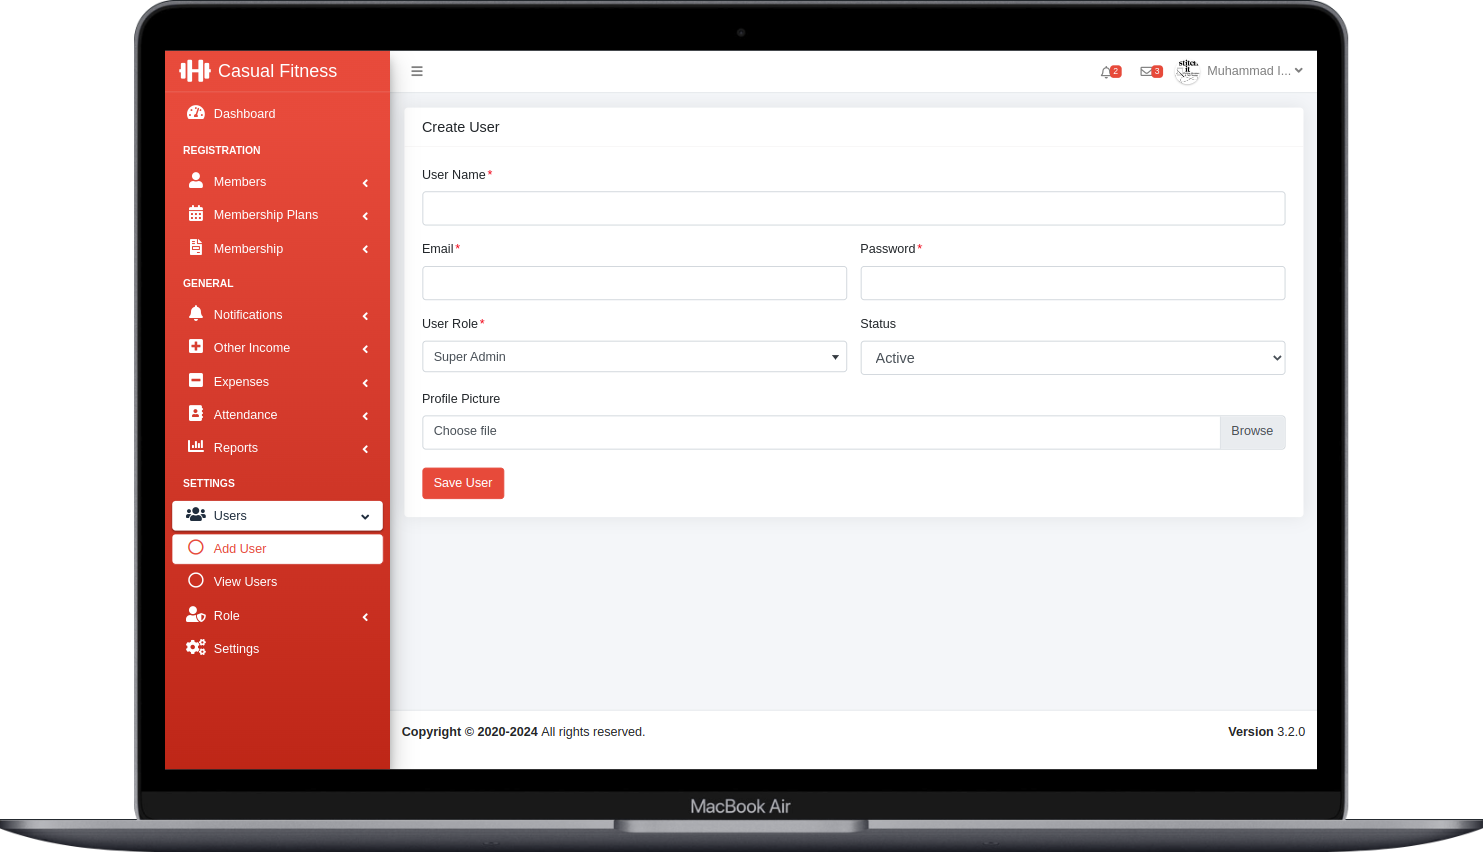
Creating a User
The Multiple User feature allows you to create users with specific access discussed above.
Steps to Create a User
- Step#1 Navigate to
User/Add Userfrom the side menu. - Step#2 After successful navigation, a form will appear with various fields. Below is an outline of each field:
- User Name: This required field specifies the name of the user to be created.
- Email: This required and unique field specifies the email of the user.
- Password: This required field specifies the user password, the password must be of nine character in length.
- User Role: This required field indicates the User Role, The Role we created in the earlier section.
- Status: This required field indicates the status of the user either Active or Disabled.
- Profile Picture: This optional field indicates the image of the user, the Image must not exceed the size of 2MB.
- Step#3 After successfully completing all required fields, you can press the Save User button in order to create a user.
You can manage the application's general settings through the options available on the settings page. Here’s a detailed guide on each setting.
![]()
Change Logo Tab
The Change Logo Tab contains the option to change the application Logo, Favicon and Login Screen image.
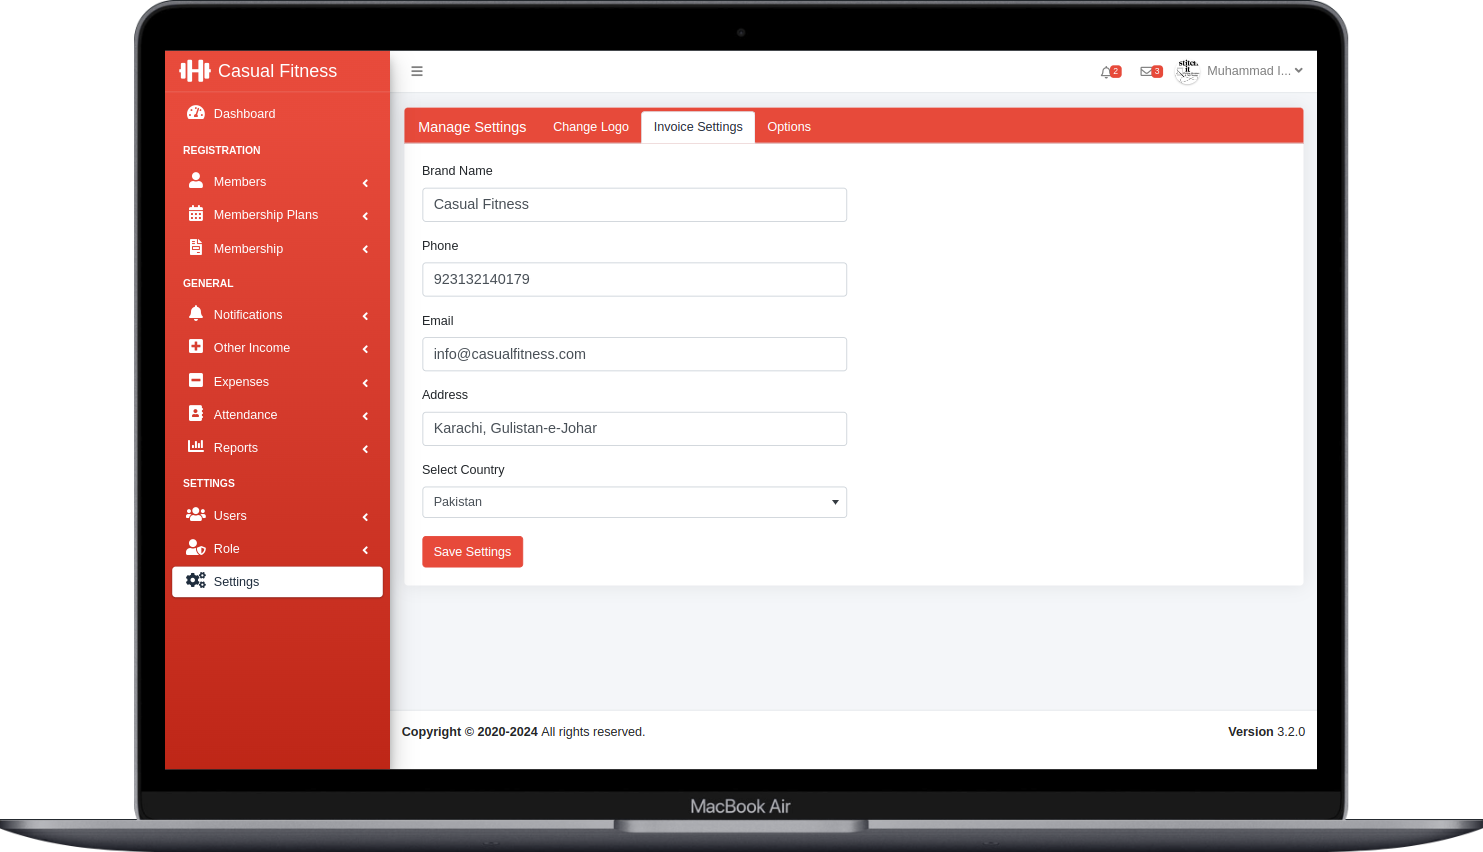
Invoice Settings Tab
The Invoice Settings Tab contains the settings used inside the invoices, below is the detail for each available field.
- Brand Name: This field represents the name of the company.
- Phone: This field specifies the phone number of you company.
- Email: This field indicates the email address that will be visible on the invoice.
- Address: This field indicate the address of your location.
- Select Country: This field displays the list of available countries, you can select the one of your country.
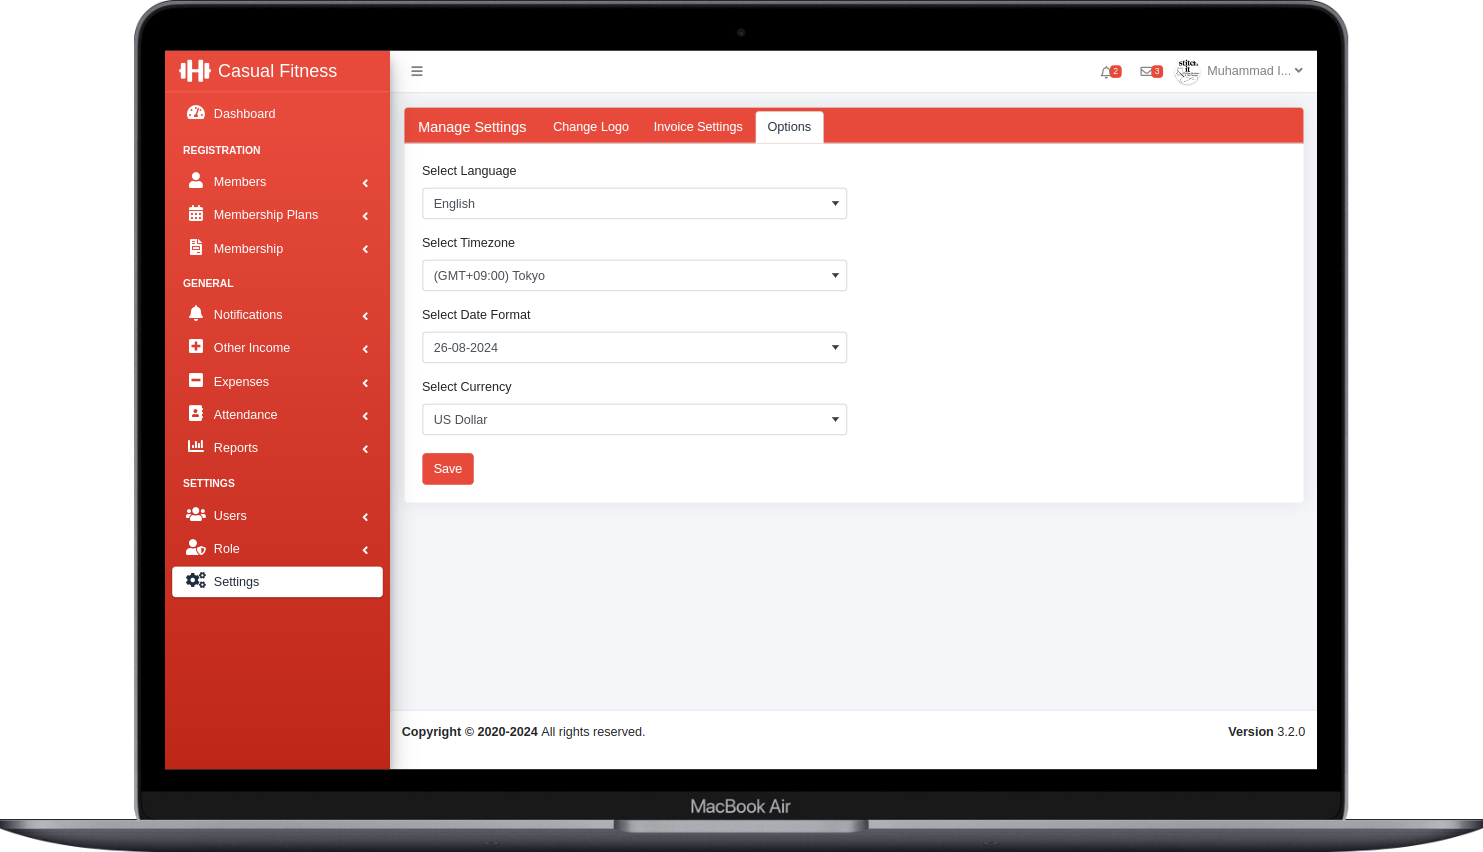
Options Tab
The Options Tab contains system settings, below are the details on each field.
- Select Language: This field displays the list of available languages, you can opt to select one of your language.
- Select Timezone: This field specifies timezone to use while using the application.
- Select Date Format: This field specifies the date format to select form the list, that will be applied throughout the application.
- Select Currency: This field displays a list of available currencies, you are required to opt one of your currencies.
FAQ
A FAQ is a list of frequently asked questions (FAQs) and answers on a particular topic.
Support
If this documentation doesn't answer your questions, So, Please send us Email via Item Support Page
We are located in GMT +5:30 time zone and we answer all questions within 12-24 hours in weekdays. In some rare cases the waiting time can be to 48 hours. (except holiday seasons which might take longer).
Don’t forget to Rate this template
Go to your CodeCanyon Profile > Downloads Tab > & then You can Rate & Review for our application.
Thank You.
More Items
Checkout Our Below Premium Items